QUICK TIP
Fix Crackles. Drop outs. Stutters. Robot Voice.
Keep in mind, digital audio is a highly complex technology, where a lot of elements have to work flawlessly together to get an uninterrupted, undistorted result: hardware quality, audio drivers, the operating system, the audio buffer size and finally the used audio software. Problems can have multiple reasons and sometimes canot be fixed with a simple switch of a button.
General rules
All audio Apps should be connected to VOICEMEETER or should not use the same audio output device as VOICEMEETER, to avoid audio device conflicts. We strongly recommend to set VOICEMEETER virtual audio I/O as your default playback / recording device.
In all cases, you must test for a significant duration to validate your configuration before going on the air. If the problem remains, send a screenshot of VOICEMEETER and its system settings dialog box to our forum to let us see your configuration.
1
Restart the audio engine
This is an option in the main menu, and in most cases, fixes these issues. Read more …

2
Select the best audio device for output A1
Keep your default settings – default buffer size / default engine mode – and select your best audio device as output A1. This gives the most stable device for the main audio output.
Choose
- an ASIO device if it presented with 256 or 512 sample buffer size
- WDM or KS with 512 sample buffer size
- MME with 512-1024 sample buffer size (as a last choice).
The device selected as output A1 sends the main stream.
The output A1 device is used to generate the master audio stream, all other I/O and streams will be based on it. So this device must work correctly.
A WDM device will be used in EXCLUSIVE mode per default. But the device could refuse in some cases, because it is already in use or because the eclusive mode is disabled. In this case, the device will be used in SHARE mode (a “S” is displayed in System Settings Dialog box – right to the output A1 Device audio format). The stream might be unstable and it could be better to use an existing KS or MME driver.
3
Avoid audio device conflicts
A typical problem comes when using the ASIO Driver as output A1 and selecting the same device with another audio interface (WDM, MME, KS) as hardware input or on another VOICEMEETER BUS.
This creates an Audio Device Conflict. If you select an ASIO device as main audio device (output A1) you must use ASIO routing capabilities (ASIO PATCH in VOICEMEETER system settings) to assign ASIO channels to the VOICEMEETER physical input or output BUS.
Keep in mind:
DO NOT SELECT THE SAME AUDIO DEVICE TWICE IN DIFFERENT AUDIO POINTS.
4
Check your stream with the integrated recorder
The best way to check that your main stream on output A1 device is running stable is the integrated Recorder/Player in Banana/Potato.
Simply play some audio tracks and check that there is no problem, no cuts, no distortions, no crackles … just the sound, that you expect.
5
Change the buffers for the Virtual Audio Path
Audio on PCs always works with buffers and buffer sizes, which are processed by the CPU and the overall system. Smaller buffer sizes result in lower latency (which everyone wants), but also in higher buffer numbers and a higher CPU load. If buffers are to small or have the wrong size to work with a software, which uses a different buffer size, it can result in crackles or dropouts.
The buffer-related issue can sometimes be found in a virtual audio path, such as from the VOICEMEETER virtual output (BUS B1, B2, or B3) to a capture application (Discord, Skype, etc…). You may check the internal latency of the related VAIO (virtual audio I/O).
The default value is 7168 samples, but this may not be enough to ensure a stable stream on a virtual link (depending on the buffer used by the application connected to it – for example, 7168 samples may not be enough if the capture app uses a 4096 sample buffer).
Then you may increase internal latency with the VBCABLE_ControlPanel app installed with Voicemeeter (there is one ControlPanel for each virtual audio cable – used as virtual audio I/O by Voicemeeter).

6
Give your Windows Audio process a higher priority
Assign the process to a single CPU core (see tutorial video below).
Several ongoing software processes with equal priority can disturb the realtime streaming of the main Windows audio process. By giving it a higher priority and/or assigning it to a single CPU core, it can be freed from resource competion.
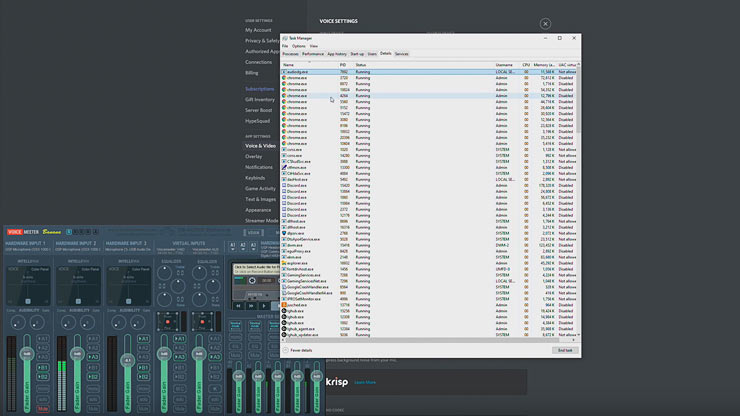
(1) Search for the Windows task manager with the Windows search field
(2) Right click the Task Manager app and select: Run as Administrator.
(3) Select the tab “Details”. Sort the processes by name.
(4) Search for “Audiodg.exe” (if you don’t see this process, you are not use the Task Manager as Administrator).
(5) Right click Audiodg.exe and set the priority to high. OK.
(6) Right click Audiodg.exe and set affinity to a single physical CPU core (select only CPU 2, 3, 4 …).
Give your Windows Audio process a higher priority.
+ Assign it to a single CPU core.
How to fix Voicemeeter microphone crackling (in Discord)
By Kamikaze DAN
7
De-install and Re-install VOICEMEETER
If nothing helps to get a stable stream, it usually means that one or several audio drivers are not correctly installed.
Don’t forget to REBOOT after the audio driver installation (or de-installation) – this is also true for any new USB audio device that you plug on your computer – even if installation is automatic, it’s better to reboot after.
Recommeded Re-installation step by step:
- Remove all USB audio devices + REBOOT.
- De-install VB-CABLE one by one + REBOOT.
- De-install Voicemeeter + REBOOT.
- Check your remaining audio devices are working correctly.
- Check there is no presence of our virtual audio driver in Windows Device Manager (in both sections: multimedia controller and audio input output).
- Re-install VB-CABLE and Voicemeeter one by one, REBOOT after each operation, and check your device list in the Windows Sound Dialog box.
- Reconnect your USB audio device once everything has been reinstalled. Check for your default playback and recording device once more.
- Run Voicemeeter and check systray option. The audio should be working properly.
In any case, your VB-CABLE or Voicemeeter VAIO should look like the image below for Playback and Recording Devices. Otherwise, you should re-install them correctly.
